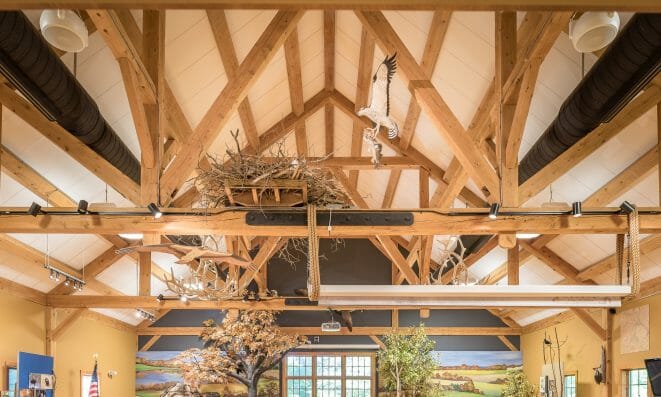

What is Timber Framing?
Timber framing is an age old method of building with timbers that connect with mortises, tenons, dovetails and shouldered joinery. The frame forms the skeleton of the building and supports the walls, floors, and roof. While timber frames are valued for their bold elegance and overall visual simplicity, there are virtually countless steps in creating that look. Each requires consummate expertise in design, engineering, aesthetics, and craftsmanship, and we created this page in order to help you learn as much about the process as possible. Click on the links to learn about timber frame styles, different wood species, and finishes used in timber framing, the building process, joinery and connections, the engineering of timber frames, and to find information for architects including specifications and sample shop drawings.
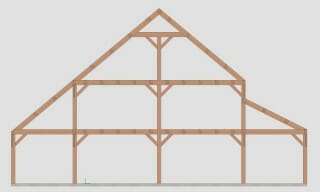
A good place to start is deciding on the frame style of the building. Is it a house, barn, church or welcome center? What should the shape be? Timber frames are often made of bents. A “bent” is a frame made of timber that is a cross section through the building and gives the building its basic shape. That shape is repeated as the building gets longer. Additional timbers can be added to the sides or ends to add character. Bents can be made in the shape of farm houses, cape cods, saltboxes, or two story buildings.
This image shows a basic two story bent with shed additions on the sides that form a classic farmhouse bent.
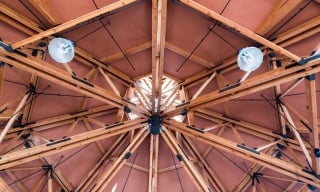
Timber trusses can also be used. their shapes include king post, queen post, scissor and hammer beam to name a few. Three dimensional trusses, like octagons are possibilities too.
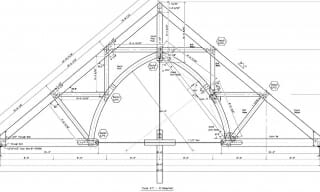
Once the type of building is decided upon, the timber framing process can begin. A frame is custom designed to fit the building. The design goes to estimating to develop a budget that fits the customer’s needs. The next step is engineering the frame to assure that all factors, like wind, snow and floor loads are taken into account. Joinery is then designed to meet engineering and code requirements and shop drawings are developed for review by the design team.
Once all of that preliminary work is complete, materials can be ordered and VTW’s skilled craftspeople cut the timbers to make the frame. After all the joints are cut the beams are sealed with finish on all surfaces, packaged and shipped to the job site for erection by VTW’s crew or a local contractor.
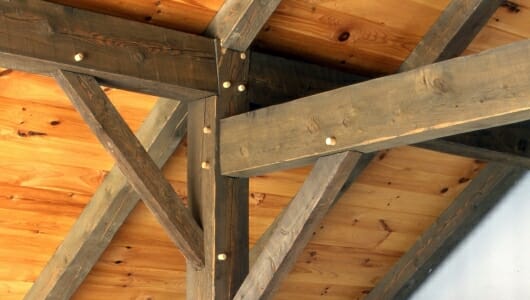
Joinery is literally the keystone to timber framing. The joints hold the frame together and give it structure. They support tension and compression loads and reactions that the frame will see from wind, snow, furniture, people and equipment.
Different types of joinery are used depending on the architectural style: traditional mortise and tenon joinery, connections using steel plates and rods, or a combination of the two.
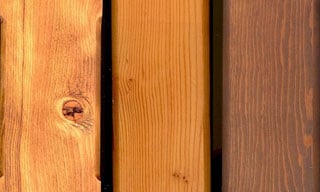
Timbers come from trees, and all kinds of tree species can be used. Our favorites are douglas fir, hemlock, native white pine, oak, and cedar. Douglas fir is a softwood that grows in the northern rain forests in the western United State and Canada. It is strong and true. The native hemlock we use is a softwood found in the east. It is strong wood that is especially well suited for barns and rough sawn timbers in rustic houses. Eastern white pine is also a softwood. It is not as strong as fir or hemlock, but it looks nice planed smooth or rough sawn. Oak is a hardwood that grows in a wide variety of places. We have been sourcing it in Kentucky. It is very strong but tends to twist and check. It is a great wood that “antiques” well. Click on the link to learn more about wood species.
We love working with architects to make their designs come to life. Pushing the boundaries of architectural design, while adhering to the requirements of engineering and code is a challenge that we enjoy. Often we will expose steel joinery because it is beautiful, or hide it because a more traditional look is desired. We can span distances of sixty feet with timber trusses or even eighty feet with octagons. On the “For Architects” page, you will find links to sample specifications and shop drawings.
Figuring out and understanding the structural forces in a timber frame is key to knowing how to build a building and make it strong. We have an engineer on staff at VTW who analyzes every frame before we price our jobs. That way we all know in advance what is required for a successful project. We start with the owners and architects vision, and custom engineer a structure to match.
Customer Service
At Vermont Timber Works, we will explain every step so that you can learn as much as possible about how your home, business, church public building or other type of structure will be built. We also promise outstanding customer service and competitive prices. Call us at (802)886-1917 or contact us online. We want to hear about your timber frame project!